Christmas Cookies Recipe
I love this time of the year: the lights, the parties, the family and friends reunions, the gifts, the Christmas decorations, the tree… All of these activities bring excitement and fill the atmosphere of Christmas celebration. At Christmas I always feel like a little girl, again.
This year with my children, I wanted us to do a lot of things together, taking advantage of the fact that they did not have school and that I could spend more time with them. One of the activities that we have enjoyed the most has been making Christmas cookies and decorating them. We have made a lot of them, to distribute the teachers at school, family, friends and acquaintances. It is a good way to give them a little gift, and they taste delicious!
There are many ways to make decorated cookies, many different recipes of dough and icing. In this case I’m going to give you the recipe that I like the most, these cookies taste amazing … In addition, this dough does not have any eggs, so it is safe to use with younger children, when handling the raw cookies.
And then you just have to get some Christmas shaped cookie cutters and that’s it!
NOTE: these cookies can be made at any time of the year and give them the shape you want, you only have to change the cookie cutters to adapt them to any other celebration, event or season of the year.
INGREDIENTS
- 1.5 cups all purpose flour
- 3/4 cup granulated sugar
- 1/2 cup unsalted butter at room temp
- 1/2 tsp salt
- 1 tsp vanilla extract
- 1/4 cup milk
PREPARATION
Sift the flour and salt together and set aside.
Using a kitchen mixer, beat the butter and sugar until it forms a creamy paste, about 2 or 3 minutes. Add the vanilla to the mixture and beat again.
Little by little, add the flour and milk, alternating and starting and ending with the flour. Mix well until it becomes a dough. You will know that it is ready when it begins to stick to the mixer’s spatula.
Cover with plastic wrap and put in the refrigerator for 2 hours.
Remove the dough and let it warm until it can be easily rolled, and preheat the oven to 180 degrees C.
With the rolling pin knead until the dough is about 3mm thick and cut with the cookie cutters in the desired shapes. Transfer to the oven tray with wax paper and bake for about 8-10 minutes until they begin to have a golden color.
When ready, remove from the oven and let cool on a metal or wooden grid. Once they are cool, you can decorate them to your liking.
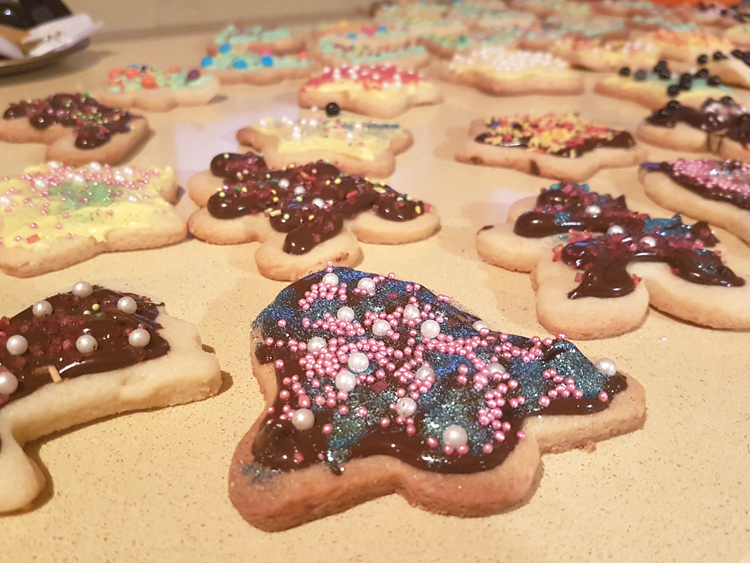
For the icing, this time I used black and white chocolate for desserts, melted and with food coloring. You just have to melt it slowly in the microwave, mixing it every 30 seconds. Then put it in the pastry bag and cover the cookies as you like. Finally cover with sugar decorations and sprinkles on top, to give them that festive and special feel.
I hope you enjoy them!